

How To Install Raspberry Pi 3 Camera
Many accessories are bachelor for the Raspberry Pi, but amidst the near popular is the camera module. But how do you safely connect one, then get the all-time out of it?
If you lot haven't tried Raspberry Pi photography, now is the time. Here's how to go started with the Raspberry Pi photographic camera module.
Setting Upwards the Photographic camera Module
Own a Raspberry Pi, and want to get started with the camera module? Mayhap you desire to brand some time-lapse movies, or build a motion-detecting security camera. Whatever your projection, if information technology requires a camera, your best option is the official camera module. Setup is straightforward, and requires you to:
- Connect the camera module: A ribbon cablevision connects the camera to the Raspberry Pi.
- Enable the photographic camera: This can be washed in the configuration screen.
- Securely mount the camera module: A suitable case is required.
- Have a picture: Utilize a only command line instruction.
Earlier y'all become started, notwithstanding, yous'll need to ensure you have everything yous need. A Raspberry Pi camera module v2 can exist purchased on Amazon.
What Yous'll Need
For the best results, gather together the following:
- Raspberry Pi (any model volition exercise, although the Raspberry Pi Null requires a different ribbon cablevision)
- Raspberry Pi Camera Module
- microSD carte with Raspbian installed (other Raspberry Pi distros can be used)
- Ethernet cable/Wi-Fi dongle where required
- USB Keyboard
- Suitable Raspberry Pi instance (run across below)
- Reliable power supply (either an adaptor, or a portable solution)
With these items collected, it shouldn't take long to become your Raspberry Pi Camera Module hooked upwardly to the Pi, and first snapping photos. Before you start, make sure you have installed the latest version of Raspbian on your microSD menu.
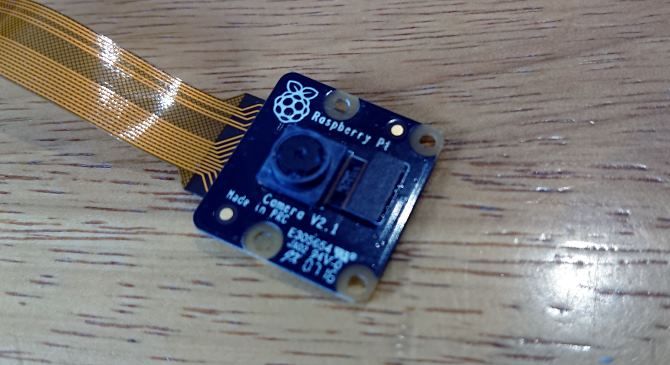
The Official Raspberry Pi Photographic camera Module
Unlike versions of the official camera module for the Raspberry Pi take been released over the years. As of 2018, version 2.0 is available, shipping in two flavors.
Standard Raspberry Pi Camera Module: This is the default pick, the ane you'll probably cull for standard photos. Colour reproduction of this 5MP camera is surprisingly good for what is a comparatively depression-cost camera.
NoIR Raspberry Pi Camera Module: The NoIR variant ships without the IR filter, hence the name. This makes it better for night shoots, although a light source is useful.
Connecting the Camera Module
When you unpack your camera module, y'all'll find it ships with a ribbon cable. This is usually already connected to the camera itself (although non always) and connects to the Raspberry Pi via a ribbon cablevision connector.
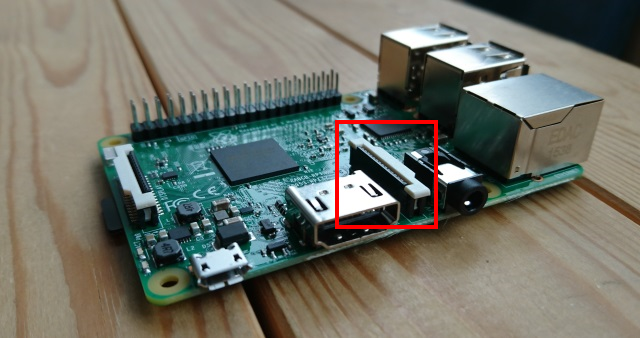
Before connecting the camera to your Raspberry Pi, be certain to accept antistatic precautions. This will avert accidentally damaging the device with static electricity. You should too take the time to identify the camera connexion slot on your Raspberry Pi first.
- Raspberry Pi B: Between the Ethernet port and the HDMI connector.
- Raspberry Pi B+, 2, 3, 3 B+ (what's the difference?): Between the TRRS/AV socket and the HDMI connector.
- Raspberry Pi Nil: on the short border opposite the microSD slot.
Next, ensure the cable is connected to the camera. In one case this is washed, it's time to carefully open up the slot connector, ensuring the small T-shaped plastic is loose. The, slot the ribbon into place, the argent side facing the HDMI connector.
With the ribbon in inserted, carefully press the plastic into place to secure it.
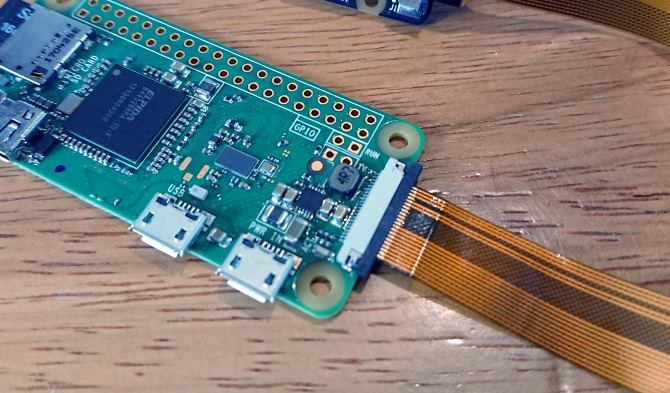
Hooking Up the Camera Module and Raspberry Pi Zero
If y'all're using the Raspberry Pi Naught, things are a little different.
On this smaller Raspberry Pi, the connecting port is smaller, and so a different ribbon cablevision is required. Ensure the silver contacts face upwards; they slot under the T-clip. This can be a trivial bit fiddly with the narrower ribbon cable.
You can social club a suitable cablevision from Amazon. Too, note that you can find cables of unlike lengths, which might prove useful for your project.
Powering Up and Enabling the Camera Module
With the camera connected, it's time to kick upwardly the Raspberry Pi. Whether yous're connected directly to a Tv set or monitor, or you're using SSH to remotely access the estimator, you'll need to open the Raspberry Pi Configuration Screen. In the Raspbian PIXEL desktop environment, you'll find this in the Preferences carte du jour.
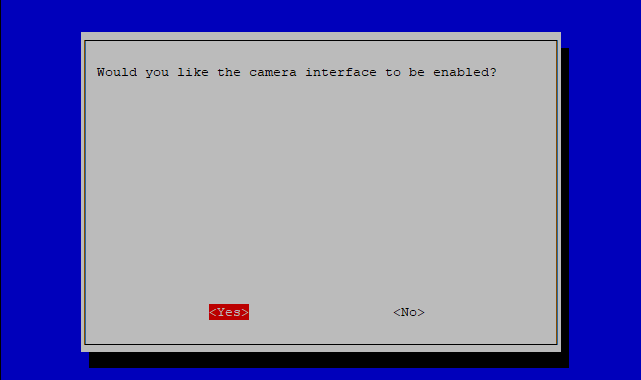
Nevertheless, you may prefer to utilize the control line and enter:
sudo raspi-config Whatever method you use, detect Interfacing Options > Photographic camera option and select Aye. You'll exist prompted to reboot your Raspberry Pi, so do this and wait for information technology to reboot.
Mounting the Camera in Your Raspberry Pi Example
Many mounting options are available for the Raspberry Pi Photographic camera Module. You could simply utilise agglutinative putty, for instance, although that'due south quite a messy option. Probably the best solution is to notice a instance with a mounting betoken for the camera module.
Here are three skillful options:
1. SmartPi Case and Enclosure
One of the height choices for a Raspberry Pi instance and Camera Module enclosure on Amazon is the SmartPi, a Lego-compatible example for the Raspberry Pi B+, 2, and 3. While the case has wall-mounting options and Lego plates, the camera module enclosure can be mounted on the case itself. There is likewise a GoPro uniform mounting connector.
2. Smarticase Photographic camera Enclosure
If yous already ain a SmartPi instance, then information technology makes sense to buy the Smarticase camera module enclosure, on its own from Amazon. With holes to screw the case to a surface, it too features "building block" compatibility for mounting on the SmartPi, or any Lego yous may accept.
3. Keyestudio Blackness Example
For a full case solution, ideal for a Raspberry Pi B+, 2, and 3, take a look at this affordable case on Amazon. The Keyestudio case features mounting poles for the Raspberry Pi Camera Module, potentally letting you use the unabridged Pi as a mountable photographic camera unit.
Snapping a Picture With Your Raspberry Pi
By now y'all should have a Raspberry Pi hooked up to an enabled camera module, and everything mounted in a case. You're now ready to take a photo.
Open a concluding window, and enter this unproblematic command:
raspistill -o image.jpg This test photo can be institute in the Pictures directory on your Raspberry Pi desktop. Other commands are possible.
For example, if the photo is upside down, yous tin use the -vf and -hf flags to flip the vertical and horizontal axes.
raspistill -vf -hf -o image.jpg For a full listing of commands for taking photos, enter the unmarried control:
raspistill You lot Can Even Tape Video!
In improver to taking stills, the Raspberry Pi Photographic camera Module can record video. Over again, you'll need to utilize the correct control, this fourth dimension using the raspivid tool. This control will record a video in Hard disk:
raspivid -o video.h264 (As with raspistill, you lot can use -vf and -hf if necessary.)
Annotation that a standard microSD card is probable to be too small for lengthy video recording (although if you have hooked upwardly an external drive, this should provide more than enough space). As such, you might use the -t flag to limit the recording time, using a value in milliseconds:
raspivid -o video.h264 -t 5000 This volition record five seconds of footage.
Have Fun With Your Raspberry Pi Camera Module
With your Raspberry Pi connected to its preferred camera choice, yous're ready to take photos, and tape video. Then, what's side by side?
Well, y'all could hook up a thermal printer and create a Polaroid-style instant camera. Or yous might apply information technology as the photographic camera in your own finish-motion animation studio.
The choice is yours. For more setup tips, cheque our unofficial Raspberry Pi setup guide.
Source: https://www.makeuseof.com/tag/set-up-raspberry-pi-camera-module/
Posted by: mcavoybearld.blogspot.com
0 Response to "How To Install Raspberry Pi 3 Camera"
Post a Comment